Thank you for downloading this ebook! My name is Priscilla and I ❤️ soapmaking. I host creative hot process soapmaking workshops filled with fun and knowledge in my online self-paced course along with live in-person workshops with my small business Super Power Soap. You’re guaranteed to learn something new and have fun in the process.
Download my free ebook to get all of these resources in an easy to follow PDF guide.
Why do I teach soapmaking?
I LOVE teaching hot process soapmaking. And I am a traveler. My favorite way to dive into a city’s culture is through crafting with local experts, unleashing my creativity, and learning from artisans sharing their unique gifts. I’m driven to create these special moments in my own way.
On my soapmaking journey, I have made countless pounds of soap. My friends and family on the receiving end hound me for soap. They tell me how handmade soap has noticeably enhanced their skin. And my students love unleashing their creativity.
These transformations inspire me to teach as many people as possible how this wonderful substance is made! Soapmaking is where I find my flow. Come join the fun and learn the art and science of artisanal soapmaking!
Introduction
We’re living in a time where we’re more connected to the environment, its ingredients, and what we put on our skin. The art of soapmaking gives you the power to develop cleansing soaps that are tailored to your specific skin needs. Thankfully, with only a handful of simple ingredients, you can make your own soap at home. I created this handy guide to walk you through soapmaking basics so that you can get started on this exciting journey.
Hot Process Soapmaking
Hot Process soap making is a fun way to create handcrafted soaps for your personal use or for sharing or selling to family and friends. You control the ingredients used in the soap and are able to customize your soap for your specific needs. Hot process soapmaking is beginner friendly and is also great for seasoned soapers. This guide to hot process soapmaking gives you a handy list of ingredients, materials, and steps needed to start your soaping journey.
Getting Started Making Soap
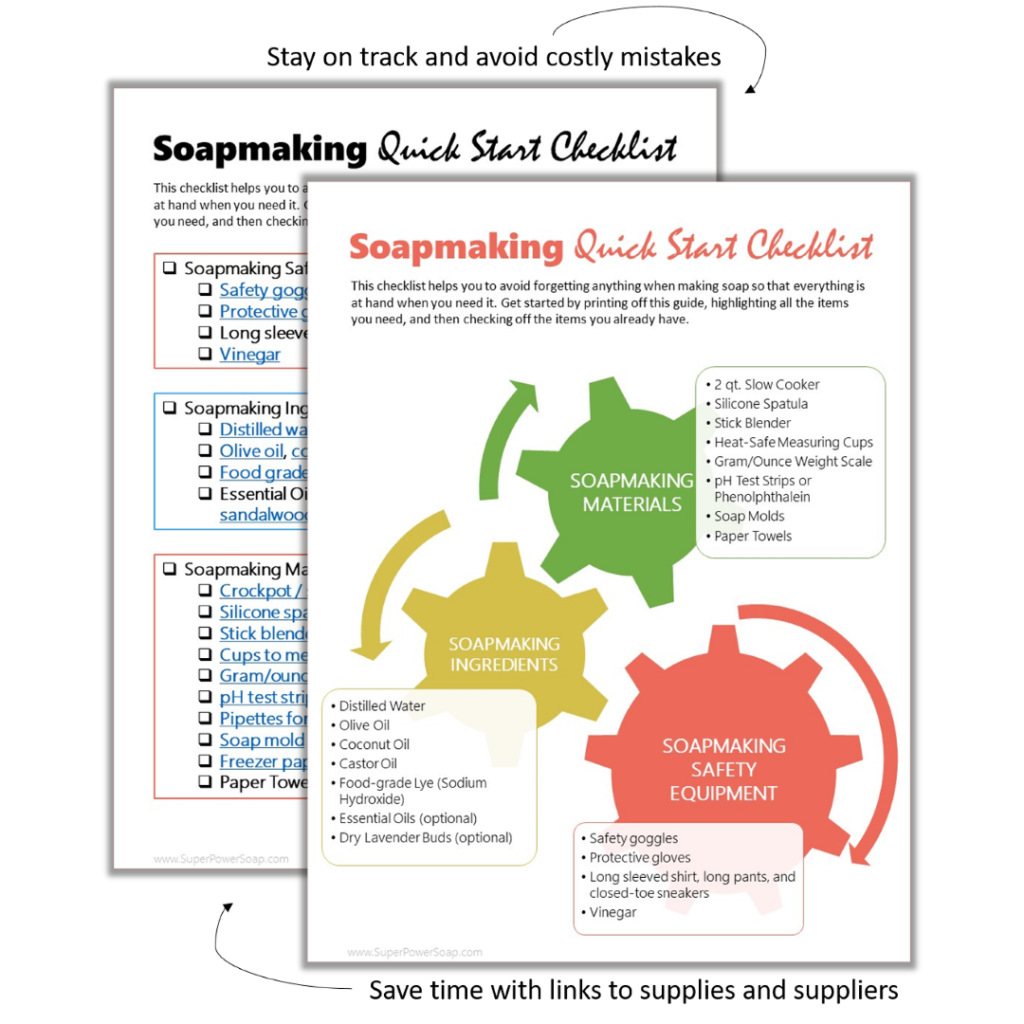
Equipment Prep
Use dedicated materials for making soap. Disinfect your tools and equipment by washing them with warm soapy water and allowing them to dry before you begin.
Soapmaking Safety
Safety first! That means goggles, gloves, long sleeves, long pants, and closed-toed sneakers. Make soap in a well-ventilated area free of potential trip hazards, people, or pets.
Lye Safety Disclosure
Sodium hydroxide (lye/caustic soda/NaOH) is a hazardous material and has the potential to create a highly reactive chemical reaction. It may be dangerous or harmful if misused. By reading this book and/or participating in a tutorial, you agree to follow all safety guidelines for handling soapmaking ingredients and materials. You release Super Power Soap and employees and agents from any and all liability for damage to or loss of personal property, sickness or injury from whatever source, legal entanglements, imprisonment, death, or loss of money, that might occur while participating. Use lye at your own risk!
Lye/Water Solution Prep
When handled with personal protective equipment and respect, lye is manageable. When I first got started making soap, I went to three different live workshops to work with soapmaking experts before going at it alone. If you are interested in an in-person class, contact me at superpowersoap.com for scheduling.
Put on your gloves, safety goggles, long sleeves, long pants, and closed-toed sneakers. Using a digital scale weigh the specified amount of lye crystals or flakes in a lye-safe container (ex. heat-safe plastic). In a separate lye-safe container weigh the specified amount of distilled water. In a well-ventilated area with safety gear on slowly and carefully add the lye to the water and gently stir until the lye has fully dissolved and the liquid is clear. The mixture will produce heat so be careful when handling the container.
Basic Hot Process Soap for All Skin Types
Whether your skin is dry, oily, or combination, this balanced bar of soap is perfect for cleansing all skin types.
Ingredients
• 5.28 oz Coconut Oil (76°)
• 5.28 oz Olive Oil
• 5.44 oz Palm Oil
• 2.33 oz Lye (Sodium Hydroxide)
• 5.21 oz Distilled Water
Materials
• Stick blender
• Soap mold
• Lye safe container
• Digital scale
• Silicone spatula
• Stainless steel utensils
• Digital thermometer
• Goggles
• Gloves
• Non-serrated Knife
Basic Hot Process Soap for All Skin Types (Palm-Free)
This palm-free bar soap recipe is perfect for cleansing all skin types including dry, oily, or combination skin.
Ingredients
• 10.5 oz Olive Oil
• 5.25 oz Coconut Oil (76°)
• 0.5 oz Castor Oil
• 2.4 oz Lye (Sodium Hydroxide)
• 5.0 oz Distilled Water
Materials
• Crockpot / slow cooker
• Stick blender
• Soap mold
• Lye safe container
• Digital scale
• Silicone spatula
• Stainless steel utensils
• Digital thermometer
• Goggles
• Gloves
• Non-serrated Knife
Instructions
- Step 1. Turn on the digital scale and measure your oils and butter in the crockpot or slow cooker you intend to cook your soap in. Zero (or tare) the scale each time you measure each oil. Prepare your lye solution (see page 7).
- Step 2. Once the oils and butter are measured in the crockpot, turn the heat setting to high and cover the pot. Let the oils and butter completely melt together.
- Step 3. With your spatula, gently stir the oil and lye mixture for about 45 seconds. Now, insert your stick blender into the center of the crockpot and pour your lye solution down the shaft of your blender carefully. While the blender is still off stir to incorporate the mixture and reduce air bubbles. Then using the lowest setting on your stick blender mix your oils and lye solution until it is at trace (the consistency of pudding).
- Step 4. Remove the stick blender when the soap traces and turn the crockpot on to low. Cover and watch the soap as it cooks.
- Step 5. Allow the soap to cook until the mixture bubbles at the sides of the crockpot. Using your spatula, stir occasionally so that the soap cooks evenly. Note: Do not eave your soap unattended – it might boil out of the crockpot. If you see this happening quickly stir. Then, cover the potwith the lid and continue watching the cook.
- Step 6. The next phase is the vaseline phase. As the name suggests it resembles vaseline in color and consistency. Your soap will have a waxy glossy appearance. At this point in time, you can test your pH with a pH strip by removing a small portion and dissolving it in distilled water. When the pH reading is less than 10, your batch of soap is complete!
- Step 7. Turn off the crockpot and quickly transfer the soap to the mold.
- Step 8. After 24- 48 hours remove soap from the mold if it’s a loaf mold cut into smaller bars and store in a cool dry area to cure for 4-6 weeks. This gives your soap time to harden. You can test the soap by scraping the crockpot and using the scraps remaining to test the lather of the soap.
Download my free ebook to get all of these resources in an easy to follow PDF guide.